#!/system/bin/b ash -x
i=0
rm /data/no_sd_upgrade
upgrade_check(){
sleep 6
if [ -e /mnt/sdcard/extsd/update.zip ] ; then
echo "---> recovery mode setting ---------------------------------------"
rm /cache/downloadfile*
sync
sync
if [ -e /mnt/sdcard/extsd/update_mark ] ; then
# mv /mnt/sdcard/extsd/update.zip /mnt/sdcard/extsd/update.zip_old
rm /mnt/sdcard/extsd/update.zip
rm /mnt/sdcard/extsd/update_mark
upgrade_check
# else
# mkdir /cache/recovery
# echo '--update_package=/sdcard/update.zip' > /cache/recovery/command
# am start -n com.ntx.msg/.MsgUpgradeActivity
# sync
# sync
# sleep 10
# sync
# sync
# reboot
fi
elif [ -e /mnt/sdcard/extsd/waveform.bin ]; then
echo "---> Programming waveform ----------------------------------------"
busybox dd if=/mnt/sdcard/extsd/waveform.bin of=/dev/mmcblk0 bs=512 seek=14336
sync
sync
mv /mnt/sdcard/extsd/waveform.bin /mnt/sdcard/extsd/waveform.bin_old
sync
sync
am start -n com.ntx.msg/.MsgWaveformActivity
sync
sync
# xiaobo begin of adb_open
# elif [ -e /mnt/sdcard/extsd/adb_open ]; then
# setprop persist.service.adb.enable 1
# sync
# sync
# elif [ -e /mnt/sdcard/extsd/adb_close ]; then
# setprop persist.service.adb.enable 0
# sync
# sync
# xiaobo end of adb open
elif [ -e /mnt/sdcard/extsd/recovery.img ] || [ -e /cache/upgrade/recovery.img ]; then
echo "---> Programming partition RECOVERY ----------------------------------"
busybox dd if=/mnt/sdcard/extsd/recovery.img of=/dev/block/mmcblk0p4 bs=8M
busybox dd if=/cache/upgrade/recovery.img of=/dev/block/mmcblk0p4 bs=8M
sync
sync
e2fsck -dy /dev/block/mmcblk0p4
sync
sync
mv /mnt/sdcard/extsd/recovery.img /mnt/sdcard/extsd/recovery.img_old
rm /cache/upgrade/recovery.img
sync
sync
am start -a android.intent.action.ACTION_REQUEST_SHUTDOWN
elif [ -e /mnt/sdcard/show_info ] || [ -e /mnt/sdcard/extsd/show_info ]; then
echo "---> Programming show info. ----------------------------------"
sync
sync
am start -n com.ntx.msg/.MsgShowInfoActivity
sync
sync
else
if [ "$i" -le 5 ]; then
i=$((i + 1))
upgrade_check
else
busybox touch /data/no_sd_upgrade
fi
fi
}
upgrade_check
Saturday, September 21, 2013
Recovering rooted and bricked Tolino Shine reader via ADB
[Draft]
 Having rooted your Tolino Shine (a post to be written), you have been using it for a while. As the days passed by and the Internal Storage was bursting at its seams from the installed apps, you may have noticed that your new ereader has become sluggish.
What is worse, some autostart system applications (Button Savior, Floating Toolbar) fail to start on their own. Have you remembered about checking the external and internal drives for errors and defragging them? No? Give them a try.
 Despite these measures, one day Tolino may just die on you. There will be not even the creeping boxes boot animation - only the initial Tolino leaf will show. Of course you won't have a nandroid backup to speak of, either.
What did not work for me:
That is what helped me instead:
If you are lucky, you will see the Recovery/Update screen. If you are very lucky, the update process will accept the update.zip file and you will have your /system and init files fixed. Proceed to root your Tolino. See my "Root your Tolino" post (in the making) with more details.
 Having rooted your Tolino Shine (a post to be written), you have been using it for a while. As the days passed by and the Internal Storage was bursting at its seams from the installed apps, you may have noticed that your new ereader has become sluggish.
What is worse, some autostart system applications (Button Savior, Floating Toolbar) fail to start on their own. Have you remembered about checking the external and internal drives for errors and defragging them? No? Give them a try.
What did not work for me:
- fastboot
- flashing recovery.img with tools or manually
- toying with init.rc or /system files
That is what helped me instead:
- Make sure you have the right ADB driver files (e.g. Xiaomi), see How I rooted my Tolino post (to be written).
- Check if you can see Tolino in the Device Manager as Google ADB, not Tolino
- Find the newest ADB.EXE package or download it off the Net.
- Connect a hung Tolino via a good micro USB cable. Try different USB ports.
- Check if Tolino has been discovered by the desktop computer. In the Windows command line run
ADB devices
- If you see the identification number of the connected Tolino device (e.g. "00096e7549872f device"), run
ADB logcat
ADB shell
- If you are lucky, you should see #, which means you are running it as a root. Run
ps
- to list the processes. Try to find the PID of the service monitor, to kill it, e.g.:
Kill 2683
- that way, the booting loop should stop and you will have more processor power. You will need it, trust me.
- Run the QtADB front end and see if you can browse the root file system.
- Remount /system as read and write:
busybox mount -o remount,rw /system
- Run
busybox mount /dev/block/mmcblk0p1 /sdcard
- to mount the SD card. (You may experiment with mounting the other images, e.g. busybox mount /dev/block/mmcblk0p4 /mnt/obb/, just to try)
- Copy one of the original Tolino update.zip files, select any from this forum, to the root directory of the internal sdcard (yes)
- Find and analyze the /system/bin/upgrade_check.sh script on your Tolino, the bolded part, see also Naberius' post. We will use a trick from there.
- On your computer, create a file named just command with the following content:
- Copy this command file to the /cache/recovery directory with QtADB, so that you get /cache/recovery/command
- You may need to change its permissions: chmod 777 command, just in case.
- Run this command, taken from the script:
am start -n com.ntx.msg/.MsgUpgradeActivity
- Run:
Rebootin the shell, or press and hold the Power button to do it manually.
If you are lucky, you will see the Recovery/Update screen. If you are very lucky, the update process will accept the update.zip file and you will have your /system and init files fixed. Proceed to root your Tolino. See my "Root your Tolino" post (in the making) with more details.
Saturday, August 10, 2013
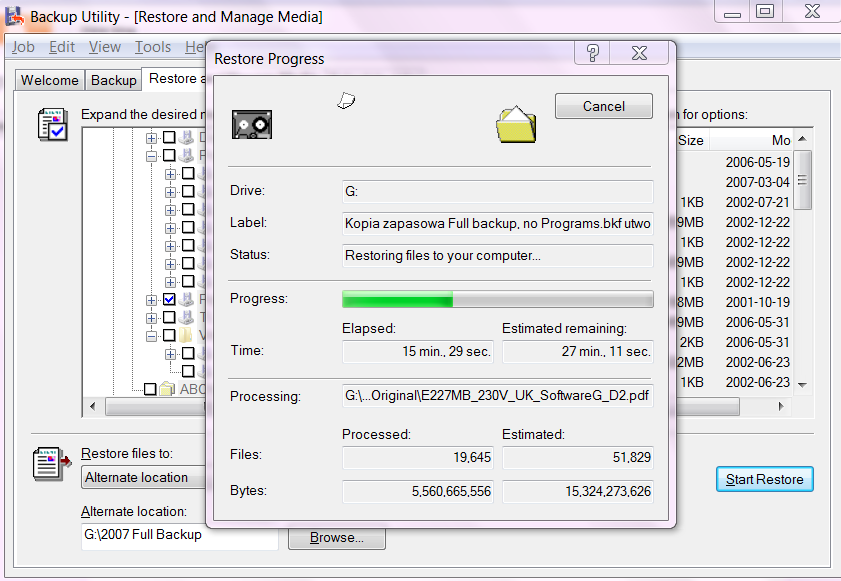
Restoring BKF backup file - in Windows 7 or newer
While cleaning old backup media, I have found a couple of NT Backup files, with the BKF extension, the earliest from the year 2001. Fond memories!
In Windows 7 and newer there seems to be no immediate way of restoring these.
Here's the fastest way I have found, using the original NTBackup utility.
1. Download these files, copied from Windows XP
2. Unpack them to a separate folder.
3. Run Ntbackup.exe, ignoring any warnings.
4. Follow the wizard.
Monday, June 17, 2013
"Insufficient storage available" Android error
 Have you been bothered with the "Insufficient (internal) storrage available" error?
 I have, for years now. Even upgrading to the ICS has not helped. I tried moving the apps to the external storage with Link2SD etc, but to little avail.
Exasperated, I analyzed the internal storage and finally found the culprit. The solution seems simple, maybe too simple. Here are the steps. Well, the step:
1. Delete the \data\logs folder.
That's it. Of course, you need to be rooted, and have the proper (simple) tools, listed below.
Here are the screenshosts
Before:

After:

Tools:


Wednesday, June 12, 2013
How to solve Kies crashes: 6.1.7601.17651 bug
Do you have an Android device? If so, do you use Samsung Kies to sync or update the content between your PC and Android?
You may have been faced with the infamous "Kies crash in 6.1.7601.17651" bug then.
It has been driving me nuts too. When using some pre-October 2012 Kies versions, I found that running Kies in Vista compatibility mode was a temporary workaround. No such luck with later post-Oct 2012 Kies updates: it crashed mercilessly on me each time, with the 6.1.7601.17651 error number as the only clue.
After troubleshooting, I discovered it is due to buggy calls to the Net 4.0 framework.
To solve it, you have to force Kies to use Net 2.0. Sounds scary? Needs not be.
1. Search for all *.config files in the Kies installation folder:
C:\Program Files\Samsung\Kies
2. Open each one. (Did I say: each?)
3. Delete the line:
<supportedRuntime version="v4.*" />
(where the * part of the number, the build version, may vary depending on your configuration)
leaving the line:
<supportedRuntime version="v2.0.50727" />
4. Reboot for good measure. Restart Kies.
This modification will force Kies to use the older, Net framework, version 2.0.
Your mileage may vary. It worked for me.
Windows Search service - Access is denied error
If you suddenly cannot search through your emails or other items in Windows, then check the following :
A. Windows Search Service.
Type MMC.EXE, Add the Services snap-in, scroll down to the relevant entry:

Check:
1. Is the service running, or just starting and stopping?
2. Is it set as Automatic (delayed) start?
3. Is it run by the Local System account?

B. Event Log
Add the Event Log snap-in

If you get: The Windows Search service terminated with the following error: Access is denied, then this may have happened:
 The folders with index files under C:\ProgramData\Microsoft\Search\Data\ have wrong security permissions. In my case the Local Service account entry was missing.
To add the missing permissions for the Local Service, right click the ProgramData\Microsoft\Search\Data folder, select Properties, Security, Advanced, Change Permissions, Add

Type: Local into the text field and press Check Names. The Local Service account should be filled in as in above.
Press OK to go back. Now you need to allow this account to modify the folder's content. Press Edit to bring up the Permissions Entry for Data window:

Select the Replace all child object permissions ... checkbox, to propagate the new permissions to the subfolders.
Click OK, making sure that no further errors crop up. If you can't modify the permissions, check if you are the owner of the folder (the Owner tab) and modify accordingly.
Now check if the Windows Indexing Service has fully started and its effects are as they should be, e.g. in Outlook:

A. Windows Search Service.
Type MMC.EXE, Add the Services snap-in, scroll down to the relevant entry:
Check:
1. Is the service running, or just starting and stopping?
2. Is it set as Automatic (delayed) start?
3. Is it run by the Local System account?
B. Event Log
Add the Event Log snap-in
If you get: The Windows Search service terminated with the following error: Access is denied, then this may have happened:
To add the missing permissions for the Local Service, right click the ProgramData\Microsoft\Search\Data folder, select Properties, Security, Advanced, Change Permissions, Add
Type: Local into the text field and press Check Names. The Local Service account should be filled in as in above.
Press OK to go back. Now you need to allow this account to modify the folder's content. Press Edit to bring up the Permissions Entry for Data window:
Select the Replace all child object permissions ... checkbox, to propagate the new permissions to the subfolders.
Click OK, making sure that no further errors crop up. If you can't modify the permissions, check if you are the owner of the folder (the Owner tab) and modify accordingly.
Now check if the Windows Indexing Service has fully started and its effects are as they should be, e.g. in Outlook:
Subscribe to:
Posts (Atom)